Yes, good people, if you record video in 720p and render it out 640 x 480 you are gonna have squished up video. If you record at 480p and render it out to 720p (which you should not do) then you will have a stretched goofed up looking video.
Simply put, using the correct project setting in your editing program will match the video file type, frames per second (fps), audio and other doo-dads that will allow the video to be rendered correctly in the intended format.
Examples of Project Settings
I want to show three examples of how some of the video editing programs handle project settings. To be clear, this concerns the editing of your video inside of your video editing software.
Windows Live Movie Maker
 |
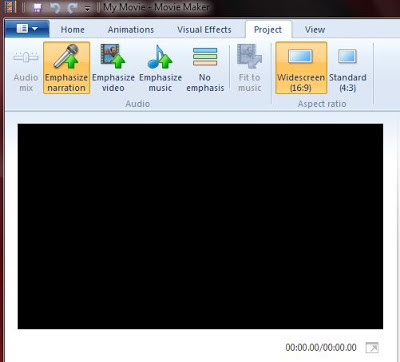
| Project Tab of Windows Live Movie Maker |
Windows Live Movie Maker is a binary experience. Using the Project Tab, you have two choices to set the correct Aspect Ratio of the video. If you are recording 640 x 480 video you want to use the 4:3 Aspect Ratio and if you are recording SD widescreen or HD video you want to use 16:9.
Serif MoviePlus X6
 |
| Serif MoviePlus X6 Project Setting |
Here is another example from Serif MoviePlus X6. You have more choices. In the example above are some of the settings for high definition video. You can see clearly what the size of the video is, the frame rate and you have the ability to create your own custom settings.
So if you have a camcorder that records HD video in 720p at 30 frames per second then that is the project setting to use.
Sony Vegas MovieStudio HD 11
 |
| MovieStudio New Project Window |
In Sony Vegas MovieStudio your have the ability to work with just about type of video.
Here is a scenario. Let's say that I recorded video with a phone that records in standard definition 640 x 480. I know that I want to upload the video to YouTube or Vimeo. I'd like it to look like it is a widescreen screen video.
Verily, there is a Internet Video setting. In the Project window select Internet Widescreen. This would set up your project so that the video would be in the pseudo widescreen format, the audio would be in sync and there will be no bars if you export it out the same way.
After you finish editing your video you can export or render your video in a variety of formats depending on your needs.
Other Posts of Interest
- Creation Tools for Your Video Watermarks
- Exporting Video Using QuickTime Pro for Windows
- Extract Audio from Video Using MPEG Streamclip
No comments:
Post a Comment
I love actual comments. Please understand that comments will be held until I get a chance to look them over or wake up, whichever comes first.
Spam and other forms of hate speech are not welcome here. And due to the actions of spam bots and the people that love them moderation is in full effect.