Showing posts with label Tutorial. Show all posts

Sunday, October 12, 2014

Creating A Digital Story - Your Place on the Wheel

You have your idea. You have put it in a fixed form on paper or in a cloud. How are you going to show it? How will you tell your story? With what tools? How much time have you got? How will your audience technologically receive your story? Will it eat up their data plan?

What method would best serve your story? You have a lot of choices; the ideas below are just touch points/idea generators.


I have a expansive view of how to create a video. If you work it right a series of screen captures with narration could be a big hit. Who is to say that a well planned GIF can't be a digital story or a means of delivering a tutorial?

Ken Burns made bank on using history, old photos and narration with his documentary on the U.S. Civil War.  The New York Times Video unit is telling strong stories by using music, narration, photos and video.

And X=Unknown?

Yes. Because Microsoft is coming out with a new presentation format called Microsoft Sway. Other vendors are searching for ways to help users and creatives to tell stories more effectively without building from scratch. A new app could show up a week from now that will blow your socks off in simplicity.

There is another reason why you should think of this now.

Lets say you decide using photos and audio is the way to go. Your energy is now directed to getting the photos, recording your audio and finding the software that will help you assemble your story quickly.

That might be Animoto,  Smilebox, Slidely, Roxio PhotoShow. It might mean using a presentation software like PowerPoint, Keynote or OpenOffice Impress.  It could mean laying out cash money for something like Photodex Producer; if you want a professional level of control.

Choices.

Other Posts of Interest

Monday, October 6, 2014

Creating A Digital Story - The Script

You have thought about your idea. You've done the research and the dream catching. You know why you want to do this and your audience. Time to put it in a fixed form. Notice I didn't say write because it isn't the only way.

You can speak it out in an audio recording. You can draw freehand or in an storyboard format


For many of us we write it out. You can just make a simple text storyboard concept.


You can stroll through the collection at Printable Paper to see if one strikes your fancy.


If you have one of the comic book creation software you could even conjure a template out of that visual format. Find whatever works for you and make it so.

Other Posts of Interest

Tuesday, September 30, 2014

Creating A Digtial Story Tutorial - Planning Brief

In the advertising world there is the brief. Long before they sell Skittles or a GoPro camera advertising firms create the advertising brief. It is a binder of what the goal of the campaign is; the message they want to communicate; who is the audience for the product and looking hard at the need or want the product potentially can fill in a user.

This is why advertisers are going loco-crazy about data collection. What do 25-year old women with disposable income and a love of pizza want in a shoe collection?

Yes, it gets that specific.  What has this got to do with you?


If you can calm yourself and listen to the inner creative muse you can use some of the same concepts of an advertising brief to get the idea of your video out of your head:

  • What your video is about?
  • Why are you doing a video?
  • Who is your potential audience? (Hint: it is not everybody. You'll need to think about who would want and appreciate seeing the video.)
  • What is in it for them? What goodies, needs or wants are going to be in your video.
  • How long will the video be; unless you are really good you are thinking about two to four minutes tops for web video?
  • Where will your audience see your video? Mobile? Desktop, TV hooked up to Roku?
  • Bandwidth considerations; 4K video is coming but many people are on data plan lock down? You might have to balance access versus quality, or you might choose not to compromise but this kicks back to who is your audience?
  • What you you have to work with? Camera, audio, equipment, no equipment, software, DIY gear?
  • Time? How much do you have and how little. In your allotted 24 hours a day where does creating a video fit in? 
So these are your starter questions. You'll have others that I don't know about but begin the process of writing down the bones.

Other Posts of Interest

Wednesday, January 22, 2014

Progress Report on My Video Project

Things really are working according to plan; on account I actually have one. This is what I've accomplished so far:

Created a Project Resource Binder - My binder is an actual physical binder that contains information about resources that I used. For instance I found a great source for public domain music. I have printed out the page that contains the rights usage and the clear permission of the author to use the music in any way I desire. If I get hit with a DCMA notice I can quickly make a PDF copy and end the discussion quickly.

Made a Project Folder - I've written about this before but it is basically creating folders on your computer that will store your video, audio and photo files for your project. It make finding things easier for you and for the software you use to edit and upload your video.

The script is completed and settled on a style format for the video. It will help me to not get side tracked on re-inventing the wheel.

Anything else; yes... I'm going through my prior unused recordings to see if there is anything videos I can re-purpose or use in an different way.

I'm late, gotta go.

Other Posts of Interest


Saturday, January 18, 2014

From Thought to Words AKA The Plan

I've got my idea locked down - a short series of videos about an observation I've had during the week or so. Two minutes or less.

Hopefully less.

The videos will have a mixture of audio, photos and video or two out of three items.

I can allocate about three hours total a week from idea conception to production/upload. Less would be better. This means that I've got to create a structure that allows for creativity but also has implied limitation.  Like cookies; Pecan Sandies, and those fudge centered chocolatey thingys.

There is a structure but there can be variations in the structure. Limitations can force you to find a way of making a story or poem interesting.

Anyway, this means that I'll need to set up a template or format so that I can concentrate on the idea and not have to worry about "being design creative" each and every time. The goal is to get the process out of the way and do what I gotta do.


I've been looking at sequential art. You know them better as graphic novels or comic books. There is an aspect of that design that can work well for a short video. I've snatched a few panel ideas that should work for what I have planned.

I've also just remembered about triptych photo layouts where you can have three separate images that tell a unified story.  Can that idea be implemented into a simple video?

I'm willing to find out.

Next Steps
  1. Create a Project Folder
  2. Write the script
  3. Make a container video with intro title, placeholders and outro title.
  4. Music - what kind, how will it be used and will it match a variety of content?
  5. Ambient audio - recording in real time with what device?
  6. Web Hosting - Vimeo, YouTube or both?

Other Posts of Interest


Wednesday, January 15, 2014

A Look at TechSmith's Marketing Infographic

Writing like a fiend but wanted to give a heads up about a neat inforgraphic pdf from Tech Smith. I found it on the site's marketing tutorial page that TechSmith has for small businesses.

You should check out the videos on that page, either as an introduction to a structured video or as a refresher.

http://assets.techsmith.com/Images/content/mkt-solutions-business/Life_of_Videos_PDF.pdf


This is just a small part of a helpful guide to how to make an informational videos better. There are things you can do to improve demonstration, tutorial or explanation videos. And even if you don't have any intention of making those kind of videos there are some goodies to be gleaned from the entire graphic.

Other Posts of Interest


Monday, October 21, 2013

Quinn Poster on Getting Video Right

Still slogging through life, academia and blogging. Today's inspiration comes from the Poynter Institute. A place where old journos pontificate and newbies discombobulate the status quo.


Portion of Tips Poster at Poynter


Those of us in the middle seem act as the bridge or conduit. We hope that both sides will take the time to listen and observe what works and what doesn't.  Sara Dickensen Quinn has a poster with the essentials for shooting videos.

Doesn't matter if you record with a smartphone or a tricked up DSLR. There are fundamentals that we all can learn from. You don't have to be a journalists to apply the tips suggested. Might be better if you weren't.

Tell the story with video and your words. Tell the truth or a close to it as you can get.


Other Posts of Interests


Tuesday, May 28, 2013

Quick Demo - Picture in Picture Using Serif Movie Plus X6

Well, slow connection or not the show must go on. You might not use Serif Movie Plus X6 to edit videos. That is okay but the concept of the picture in picture technique is similar across many of the consumer level video editing programs.

What got me going about this is that I have an idea for a short video project about memories that are gone or almost about to evaporate into history.

I can see the need to do a lot of video in picture frames.


I generally forget how to do it picture in picture. I do read the manual but it never sticks in my head. Making a screencast video on the process certain helps retention.

A Couple of Reminders:


You need a .png file with a transparent area. You can use a program like Irfanview, Snagit Editor or one of the online photo editing programs to create your .png photo.

Aspect ratio – if your video is 16:9 widescreen and your image frame is in the 4:3 aspect ratio you are going to have issues. Match your frame to your content or your content to your frame but do not stretch a video to fit inside of a transparency area, especially if you have people in it.


Other Posts of Interest

Saturday, May 18, 2013

Video Bandwidth Definition and Considerations

Understanding bandwidth is a part of the process of creating web video. Now granted, with Smartphones, direct mobile upload services and Apps like Vine thinking about bandwidth may not be relevant.

Then again, you could find yourself in a hotel room or cousin’s Mickey bedroom with a slow connection and you have a video that you have to transmit using a less than speedy connection.

So to kick this off proper I think a definition post is in order.  I am going for simplicity. Clarity. Conceptual understanding.

What Is This Bandwidth That You Speak Of?


Bandwidth is the amount of data that can move between connection points on a network in a certain amount of time. Depending on your Internet connection speed you might be restricted to a specific amount of data that you can send and received.

On a computer/Internet network that speed is measured as bits per second.

For example, on a 56k modem it takes much longer to move data from one connection point to another. On a T3 line it happens in a blink of an eye. Video has more data than a text file or a web page.

The more bandwidth you have the faster the video can make the connection to the desired location. I now hereby invoke the Tubes comparison


The imaginary tubes of the Internet

If the data that makes up the video is small it can pass through a 56k connection in a reasonable amount of time. If it is a 50MB that is being transmitted via a 56k modem the data has to be broken up into small packets, pushed down the line and then re-assembled at the data location.

In a perfect world this would take a lot time. Things are not perfect. You have your anti-virus/malware program checking in, your email alerts wanting attention, and iTunes trying to update itself again. Or you have a bad phone line/Internet connection.

And it isn't just one pathway; it is a network of other users sending and receiving data. Billings of data files zipping from one point to another.

It Not Just About You


The person or service receiving your video is going to have issues as well. Sending a large file to a user that has limited connections speeds or data access plan is not helpful. They can’t even download it to see it.

Some e-mail programs and services have restrictions on the size of the e-mail or data file that can be sent to a user. You could send it to a cloud service but the user could still struggle with waiting for the video to buffer enough to play.

The Balance Act


After you finish creating your video you are going to compress it to a particular video size and format. That could alter how the video looks. Can't make it too small, too big or compress so much that the video is hard on the eyes to watch.
 
I think an awareness of how bandwidth can affect potential viewers of your video is a good thing. I think we as creators can make design or compositional choices that would not only improve the video but could shave a megabit or two off the video.

Does it really need to be in stereo?
How many transitions/effects do you need?
Can I find the sweet spot that balances all of the various users and delivery method?

This was more of an issue in the early days of web video but people have gotten sloppy and complacent. With the growth of mobile media and inexpensive tablets we might want to revisit how best to compose a video for multiple viewers.

Other Posts of Interest

Thursday, March 14, 2013

Backgrounds for Creating Simple Channel Art Part 3a

Another option that you have for making your Youtube Channel banner or poster is to do it yourself.

If you have access to any kind of presentation software you can create a slide with the background you want and then export it out as a jpg or png image file.

Let me show you what I am talking about; I have a version of Corel Show to use as a demonstration but really, any modern slide software can be used to create a computer image from a presentation slide.

I'm changing the background color of the slide but there is no shame in drawing a large square and formatting the object.

This is really simple but if you have never used presentation software then this can take longer than you anticipated.

Clicking on the images in this post will make them larger for those that want to see details.

This is a solid background.

Background selected as solid color

 This is a photo inserted into a slide.


Inserting a photo into a slide


You can also select a pattern with your own color choices...


Applying a pattern to the background


or as a gradient fill...


A two color gradient fill


or a repeating texture.


Repeating textures from the application but you can add your own.


The next step is to export the slide as a jpg or png file. Depending on your software this command might be in the Save As area or in another command called Export.


You may or may not have the option to set the final image size; it depends on the program.


If you can select the image size and you are going to upload to your channel with no further tinkering then set the image size for 2120 x 1192 (I made a boo-boo in the example) and then save the image.

Again, this is a generic example of how to do this. Your software might be different. If you have a very old version of PowerPoint you will only be able to export to a wmf image file. You would need to convert the image to jpg or png. 

Concerns to Be Aware Of


Older versions of presentation software were set up for square or the 4:3 aspect ratio. You might have to crop the image later. If you have the option to select widescreen as an option or you find a widescreen image that can be a work around.

Text is problematic. It can look great in the program but crappy when exported. You'll have to test that out for yourself.

You can add photos but depending on the version of software you have editing them might be a challenged or not possible inside of the program.

You can do export slides to photos with most current versions of presentation software.

This includes:

Mac Os
Windows
Open Source – Yes, it is intentionally free software.
Web Presentation Software
and I'm sure a there are a few tablet office apps that can do the same thing.

But I hear a small wee voice saying "I have photos I want to combine and I don't want to use or install presentation software. What else you got?"


Other Posts of Interest


Wednesday, March 13, 2013

Backgrounds for Creating Simple Channel Art Part 3

One of the first things your will need is a background image.of 2120 x 1193. I’m thinking that a widescreen wallpaper type image would be a quick start to building your channel art.

There are safe and legal places to find background art but it is a pickle to find those places. A sour pickle. Many of the so-called free background and wallpaper sites state that they have free content but I saw a lot of copyright images that I am sure that the original owner does not know about.

There are predator freebie sites. There was one site that when I clicked on a button to change the size of the image took me to another screen and tried to get me to click a dodgy button to fix my Flash settings.

Ah, no. Not going to happen. Below are some of the places you can visit to find the foundation or background image for your channel. These are idea generator type sites to consider.


Photo © European Space Agency - Hubble Telescope


European Space Agency – Hubble Telescope
There are over a thousand space images that are free for personal or commercial use. All they ask is that you have a clear copyright attribution either on the image or some place prominent for others to see where the image came from.

After you locate an image you click the image to go to the information page. In the lower right corner are the various formats and sizes you can download; for newbies I would suggest downloading the as close as you can get to 2120 x 1193 wallpaper sized image. You can crop or re-size the image later.


Freepixels.com Backgrounds
There are plenty of them, abstracts, texture and geometrics. Most are in the 4:3 aspect ratio and the pixel sizes varies from image to image. You are free to use the image but you can’t re-purpose it for profit, i.e. make logos, bags or buttons for sale nor can you use the images for salacious content.

I would suggest that you avoid using images with identifiable people or any trademark imagies that might appear in an image. In other words Freepixel places you on the hook for responsible usage.


Morgue File
This site has a mixture of people, landscapes and artistic imagery. For the free images stick with the Morgue file tab. Content is free to use for personal and commercial use however the original creator still owns the copyright of the image. Attribution is encourage.

The images may or not be in the widescreen 16:9 format, you might have to crop or adjust the images.


UnProfound.com
Pick a color, any color and that will lead you to the photos that match that color. It is a small collection compared to the others but you can do what you like with the photos and images according to the FAQ

Like I said, these are idea generators. The backgrounds I selected might be too intense or not appropriate. You like a section of one image but not the whole thing. Then again, maybe you have found the one photo that represents your channel.

 But what if none of the above floats your boat?

Don’t touch that dial, we’ll be right back…

Other Posts of Interest

Monday, December 17, 2012

There Is No Secret to Making A Video

I just came away from a bad blog trying to game the system by having people pay for crappy private label regurgitated fecal matter. I have ranted about this irritation in previous posts. It isn't going away but I'll fight it with all that I have to give. You don't have to pay for bad information.

There are so many resources that really try to give you the straight scoop. Part of my mission is to get you what you need to make videos or to point the way to others that communicate the concept better.

There are creators that come at video education from a sales and marking background. There isn't a thing wrong if the person actually has a grip. There are the technoids, the Pro-Am circuit and everything else in-between.

You know what? You have what you need and the rest can be acquired when you are ready. So here is the short version:

Record/Capture


You can record with a:
  • WebCam
  • Smartphone
  • Media player like iTouch, 5 Generation Nano or any multifunction MP3 player
  • Tablet
  • Still Photo Cameras with video functions
  • Camcorders
  • Screen Recorders 
  • Game Engine Recorders
You have to work hard not to have some kind of recording device these days. Not all of the the above devices will be the best quality but you have what you need to get started.

Edit


You don't have to edit. You probably should but you don't have to. If your video is longer than a minute, yeah you need to edit.


On the Mac OS you have iMovie. On the PC side you have various incarnations of Windows Movie Maker. Those are the known quality freebies that will work with your system.

I hear tell that Lightwork for Linux is just about to come out of Beta. Long have the Linux crowd has suffered so this is welcome news.

For under $100 you can find excellent user friendly video editing software. You can even find good stuff for under $60.  Paying for quality video editing software can make the process at a lot easier.

Export/Upload


If you choose to edit you can export the video to a desired format, DVD for those relatives that do not do the Internet. MP4 for uploads to video distribution services like Vimeo and YouTube or your social media pipeline.

If you don't choose to edit then you can use the service of your choice to transfer a copy of the video from your device to a distribution service or social media account.

That is what you need to know. Now it isn't everything that you need to know. This is the foundation or your starting point.

Other Posts of Interests

Saturday, December 1, 2012

Revised YouTube Creator Playbook

This will be a quick post because typing and sneezing don't mix. In case you haven't heard, the YouTube Creator Playbook has been updated. There is a web version and you can download a pdf copy. 
YouTube Content Playbook

There is a lot to take in if you are of a mind to make money or grow viewers. I'd read it even if you are a Vimeo user. Or have no interest in monetizing video. This guide is more for people that want to have an on-going web series or a content specific channel.

You don't have to be a mind reader to know that there is a move away from user generated content that looks like crap. Those video will still be allowed but I think there is a clear message from YouTube that it wants to be a major distribution channel with unique, quality content.

That content has to come from those folks willing to step it up and make better looking and sounding videos. This is current guide on how to do it.

Reading the page on Captivate Your Audience tells you point blank how to set up the desired structure of the video series. You could follow it to the letter. Or you can adapt it to your needs or not use it at all.

But you should read it. If you are using the web version there are example videos to help you understand what they want you to aim for in terms of quality.

I'm crawling back under the covers.


Other Posts of Interest

Tuesday, November 27, 2012

If I Had Just 5 Minutes

Making a video can be as easy or as challenging as it you need it to be. One of my goals is to make that process a bit easier to understand. If I have only five minutes to share with you how to make your video better this is what I would tell you at a high rate of speed.

I'm going to use the word device because people are now recording on smartphones, tablets, camcorders, still cameras and all manner of gadgets.

Be Aware of The Light
  • Make sure that you have the right light settings on your device. Automatic is fine if you are a newbie. When you get more experience you can use your devices setting to match the actual lighting types, Daylight, Incandescent, Tungsten. Hmm, I need to find out what class LEDs come under.
  • Don't shoot into the sun with people in front of you. 
  • Don't have them squinting into the sun either. 

Give Yourself Coverage

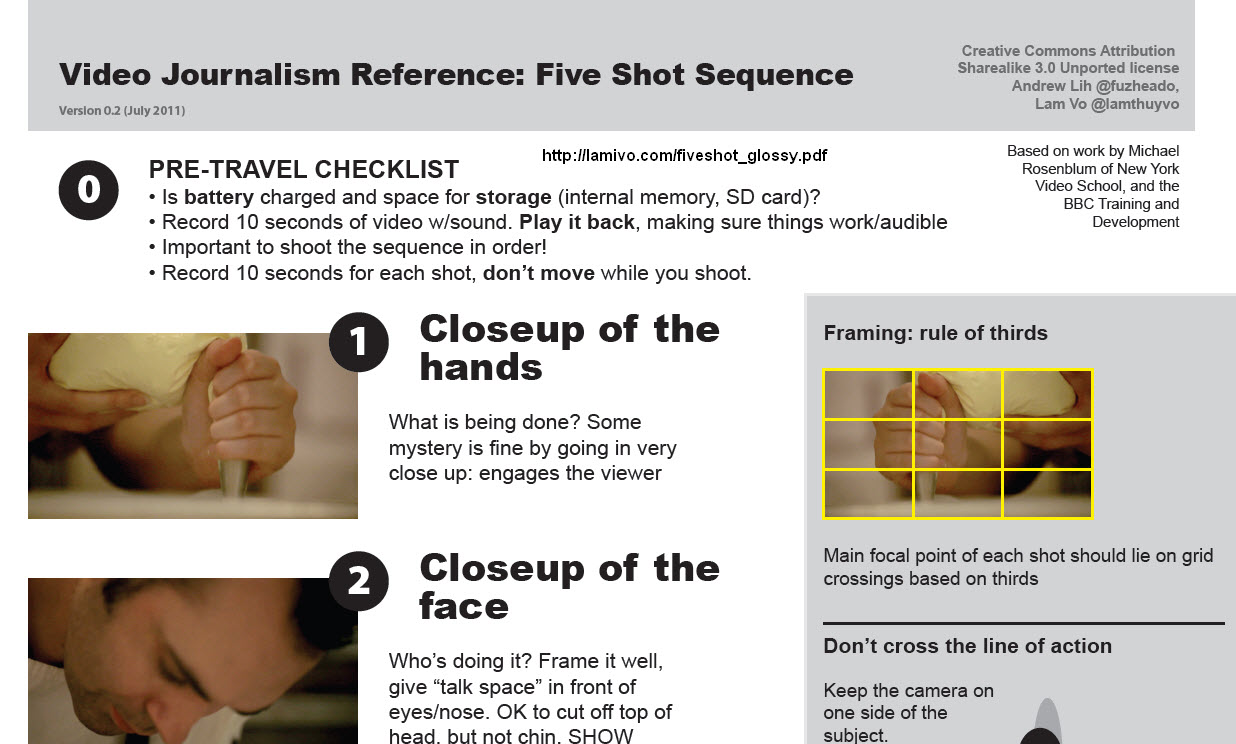
Once again, I will reminded you of the 5-Shot Method, it is not just for reporters recording quick video:
  • A close-up shot of the hands
  • A close-up shot of the face
  • A wide shot
  • An over the shoulder shot
  • A unusual or alternative view of the subject. 
This gives you choices when you edit your video. If a shot doesn't work out you have other choices you can plug into the void.

Stabilize The Shot
  •  Use a tripod when you can. For small camcorders there are tripods that you can carry in a messenger size bag. 
  • If you use a tripod don't forget to turn off the image stabilization if you have it.
  • If you don't have a tripod then learn the techniques to properly hold your device.

Master the Audio
  •  Know where the microphone is on your device. Sounds stupid to say but with pinhole mics on handheld devices it is easier than every to accidental cover the microphone with your finger.
  • If possible use an external microphone to record audio. Another option is to use a recorder like the Zoom H1 that will act as a primary audio recorder.
  • Be aware if you hear the sound of wind, air conditioners, electrical devices and any other audio killers. Deal with it if you can. If not, you might with certain software be able to control them when you edit the video. But don't count on it.

Other Posts of Interests

Monday, October 15, 2012

Add Video Id Bug Using Sony Vegas MovieStudio 11

In this post, I want to share with you how to add that .png graphic file to a video editing program. In this demonstration video, I'm using Sony Vegas MovieStudio HD 11.


This video isn't perfect but there are no Chipmunk voices either. Yes, there is a tutorial in the wild with an intentional Chipmunk voice. Don't do that. Ever.

There are two ways of doing this task in Sony Vegas, you can use the Event Pan and Crop command or you can use the Track Motion one.

I took the road easiest to travel and demonstrate using Track Motion. Well, I thought that this is the easier road. More on that later.

Other Posts of Interest


Friday, October 12, 2012

Add Logo to YouTube Videos via The Video Mojo

Just saw this posed on BlogHer and want to make other folks know about Jennifer's blog,  TheVideoMojo. Jennifer is an educator and creates training videos for clients. There is good stuff over at that part of the Internet.


In this video, Jennifer shares with you how to add a video logo, watermark, Video ID bug or whatever you want to call it this week to your YourTube videos.

That is one off my lists but I need to get scampering to show what else you can do with a logo or Video ID bug.


Other Posts of Interest

Sunday, October 7, 2012

Dyland Bennet - A Simple Guide to Depth of Field

If you are a photographer or a video person in serious training you are going to need to understand the term depth of field. Depth of field is kind of like a grammar concept.

When you want to take better photos or shoot video you need to shift your visual perception about what is in the foreground, what is in the background and how light will affect the quality of the image or recording. Add the lens, focal length and a bunch of other factors to juggle; it can be overwhelming

Dyland Bennet has a tutorial video on explaining depth of field. This is one man's attempt at an explanation.


If you like this one also check out his video explaining F-Stops and Understanding ISO.

If you a casual point and shooter you do not have to watch this video. Nope. I don't want to call it vidgeeky but it is 16+ minutes for a reason.

Other Posts of Interest

Tuesday, September 25, 2012

EditShare's Lightworks Tutorial Resources

EditShare's Lightworks is a a professional level video editing program. I can't begin to list the features this baby has compared to an entry level consumer video editing software.  That is an important distinction.

There is free as in Windows Movie Maker and there is the free Lightworks version.  This software is more in the class of Adobe Premier, Avid, Final Cut Pro 7, that neighborhood.

There are kind people in the neighborhood who are making it easier to learn and understand the software.

Shaun aka Shaunthesheep has a slow, deliciously informative video for those people wanting to transition from a basic video editing program to Lightsworks. You can find his tutorial videos on his YouTube page or at the Lightworks forum page.


You also want to romp around the Downloads page for the Quick Start Guide, User Manual and Hints and Tips by users guide.

Peter Bridgman has 10 tutorial videos to help you get a grip on using the program.


This is the first in the series that is located on the Tutorial page of the site.

Before you download it is important to understand that there limits to certain features in the free program. You have got to read the Compare Versions chart to see if you can live with those limitation.


It might be worth $60 a year for the full version. Or you could work in the freebie version, export the video and use another program to generate the video in the format you need.

Up to you.

Related Posts

Monday, September 24, 2012

Vidoe Basket of Goodies #4

The Online News Association just wrapped up their meeting in San Francisco this past weekend. My Twitter feed was bobling with folks attending the conference.

One of the great things about a Twitter hastag is that it can lead to hidden treasures. Professor Lih and Lam ThuyVo had a session on online video equipment and practices.

These are some of the resources you should check out to build your skills:

http://lamivo.com/equipment_handout.pdf
 The ever popular Five Shot Sequence and Recording Tips.

http://lamivo.com/fiveshot_glossy.pdf

This is some mighty find stuff to have in your head. From visiting that site I stumbled into a photography blog with a great philosophy on using the camera you have to take great photos. It is called The Bastards Book of Photography.

http://photography.bastardsbook.com/toc/

I love this site. It is just the right attitude and approach to not only easying the anxiety about getting the right shoot but using the equipment you have on your person right now. Even a decent base line point and share camera now takes good photos and video.

We just need to work within our skills and the camera abilities. Or Smartphone. GoPro, Tablet. Instagram. Whatever you are using. Doesn't matter if you work in photos or video. Go over there and suck up some of that good stuff.

Related Posts

Sunday, September 23, 2012

Export Video - Windows Live Movie Maker PITA Version

Update 07/22/2013 Windows Live Movie Maker has added new export options to this video editing program. It now exports to the .mp4 video format and to Apple and Android devices. Please check out the current post on this topic.

This is now a historical post that I guess I'll take down eventually.  Or not.
****************
I fought the battle and this is my testimony. This really was a PITA (explained in the video if you don't know what that

Here is a summary of the video:


Windows Live Movie Maker 2011 only saves and exports videos in the .wmv format. You will need to save the video and then use a video conversion software to change the video into .mp4.

To balance the size of the video file and quality you should use the custom settings.


Should a newbie try this?

Heck no. If you can afford one of the current versions of a video editing software please purchase and use it to produce native .mp4 videos.

Should an experience person try this? Only if they are stone broke and can't afford new software or upgrade to Windows 7 or Windows 8. If you can upgrade to the new OS then you can download and install the Windows Essentials software from the Windows Team Blog.


Related Posts